
Getting Started
Schedule a follow-up activity
What this does
An activity is a follow-up task attached to a record — call this customer, chase this approval, upload this drawing before the survey. It carries a deadline and an owner, it appears on the record and in the owner's activity list, and it keeps appearing until somebody marks it done. Notes record what happened; activities are what make something happen.
Steps
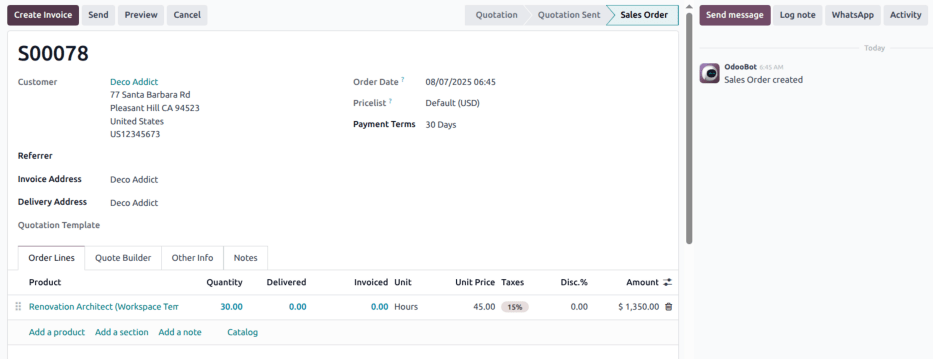
The activity now appears in the chatter under Planned Activities, and on the owner's clock menu in the top bar.
Activities are follow-up tasks tied to a record in a WindoorERP database.
The icon used to display activities varies, depending on the activity type:
- (clock) icon: the default activities icon.
- (phone) icon: a phone call is scheduled.
- (envelope) icon: an email is scheduled.
- (check) icon: a "to-do" is scheduled.
- (users) icon: a meeting is scheduled.
- (upload) icon: a document is scheduled to be uploaded.
- (request signature) icon: a signature request is scheduled.
-
01
Open the record and click Activity at the top of the chatter.
-
02
Choose the type: To-Do, Email, Call, Meeting, Document, Signature or Grant Approval.
-
03
Write a short Summary — "Discuss the revised quotation" beats "follow up".
-
04
Pick the Due Date, and change Assigned to if the task is not yours.
-
05
Add anything the person needs to know in the note field, and click Save.
Schedule activities
Activities can be scheduled on any page of the database that contains a chatter thread, Kanban view, list view, or activities view of an application.
Chatter
Activities can be created from the chatter on any record.
To schedule a new activity, click the Activity button, located at the top of the chatter. In the Schedule Activity pop-up window that appears, fill out the Schedule Activity form.
Kanban view
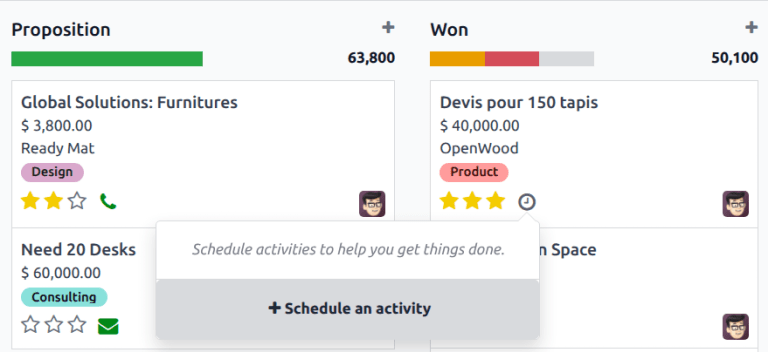
Activities can also be created from the (Kanban) view.
To do so, click on the (clock) icon located at the bottom of an individual record.
Click + Schedule An Activity, then proceed to fill out the Schedule Activity form.
Note
If a record already has a scheduled activity, the (clock) icon is replaced by the icon that represents the existing scheduled activity. Click on the activity type's icon to schedule another activity.
List view
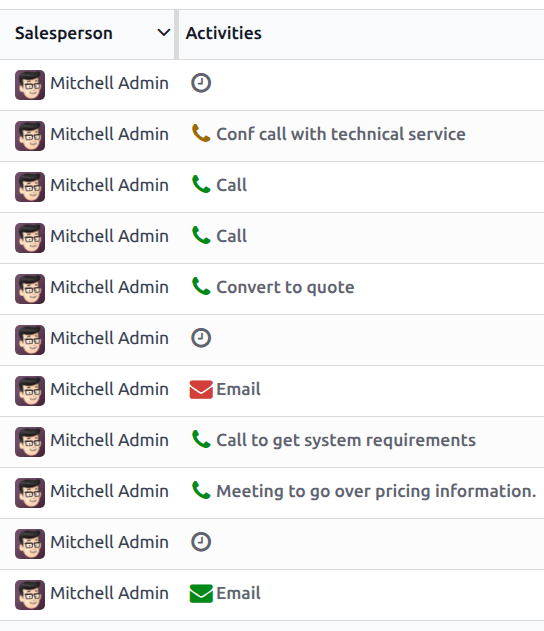
Activities can also be created from a (list) view.
If the Activities column is hidden, reveal it using the (settings adjust) icon in the far-right of the top row.
Then, click on the (clock) icon for the record the activity is being added to, and click + Schedule an activity. Proceed to fill out the Schedule Activity form that appears.
Note
If a record already has a scheduled activity, the (clock) icon is replaced by the icon that represents the existing scheduled activity. Click on the activity type's icon to schedule another activity.
Activity view
Most applications in WindoorERP have an Activity view available. If available, a (clock) icon is visible in the top-right corner of the main menu bar, amongst the other view option icons.
To open the activity view, click the (clock) icon.
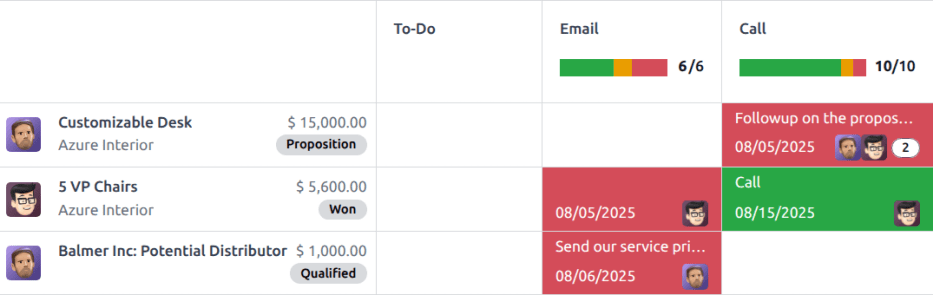
In this view, all the available activities are listed in the columns, while the horizontal entries represent all the individual records.
Activities that appear green have a due date in the future, activities that appear orange are due today, while activities appearing red are overdue.
Colored bars in each column represent records for specific activity types, and display a number indicating how many activities are scheduled for that type.
If multiple activity types are scheduled for a record, a number appears in the box, indicating the total number of scheduled activities.
Note
Activity colors, and their relation to an activity's due date, are consistent throughout WindoorERP, regardless of the activity type, or the view.
To schedule an activity for a record, hover over the corresponding field. Click the (plus) icon, and then fill out the Schedule Activity form.
Schedule Activity form
Activities can be scheduled from many different places, such as from the chatter of a record, or from one of multiple views in an application, when available: the Kanban view, list view, or activity view.
First, select an activity type:
- To-Do
- Call
- Meeting
- Do Stuff
- Document
- Signature
- Grant Approval
Then, enter the following information:
- Summary: enter a short title for the activity, such as
Discuss Proposal. - Due Date: using the calendar popover, select the activity's deadline.
- Assigned to: by default, the current user populates this field. To assign a different user to the activity, select them from the drop-down menu.
- Log a note: add any additional information for the activity in this field.
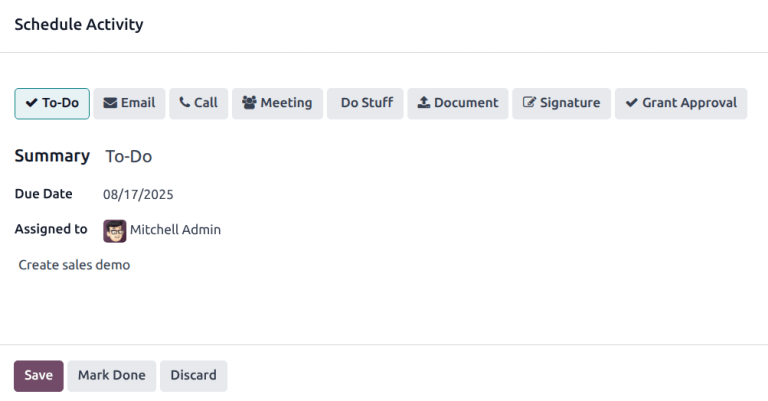
Click Save to schedule the activity, and add the activity to the chatter under Planned Activities. Click Mark Done to add the details of the activity to the chatter under Today.
Schedule a meeting
If Meeting is selected as the activity type, enter the information as instructed above, then click Schedule. This opens the user's calendar to add and schedule the activity.
Click on the desired date and time for the activity, and a New Event pop-up window appears. The summary from the Schedule Activity pop-up window populates the Title field.
Enter the information in the New Event pop-up window, then click Save & Close to schedule it. Once scheduled, the activity is added to the chatter under the Planned Activities section.
All scheduled activities
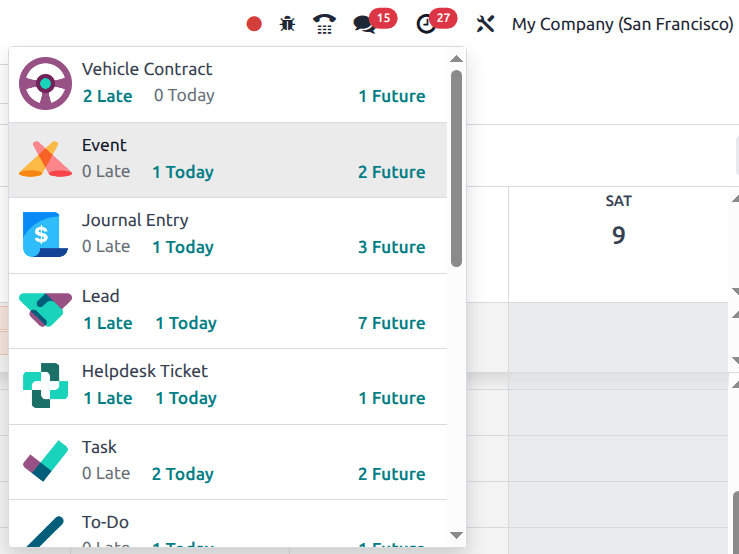
To view a consolidated list of activities, organized by application, click the (clock) icon in the header menu, located in the top-right corner.
If any activities are scheduled, the number of activities appears in a red bubble on the (clock) icon.
All activities for each application are further divided into subsections, indicating where in the application the activity is to be completed. Each sub-section lists the number of scheduled activities that are Late, due Today, and scheduled in the Future.
Example
In the Time Off application, one activity is scheduled to be done in the All Time Off requests dashboard, and six activities are scheduled to be done in the Allocations dashboard.
These requests appear in two separate lists in the all activities drop-down menu: one labeled Time Off and one labeled Time Off Allocation.
Tip
The option to Request a Document is available at the bottom of the list of all scheduled activities.
Activity types
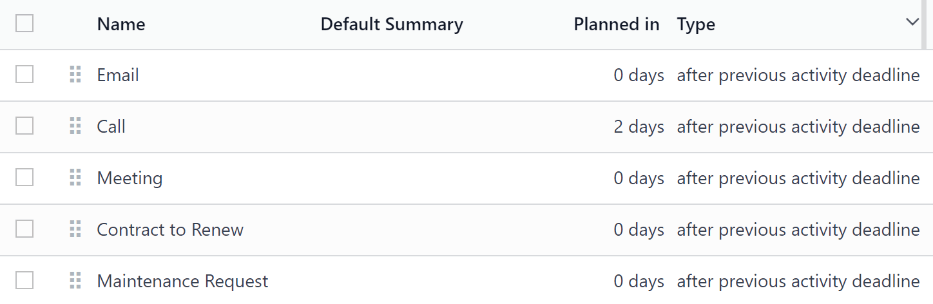
To view the currently configured types of activities in the database, navigate to Settings app › Discuss section › Activities setting › Activity Types.
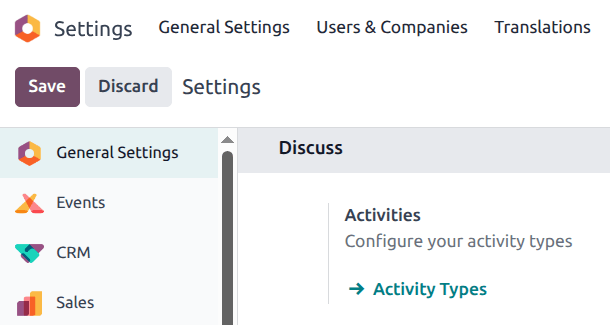
Doing so reveals the Activity Types page, where the existing activity types are found.
Tip
Individual applications have a list of Activity Types dedicated to that application. For example, to view and edit the activities available for the CRM application, go to CRM app › Configuration › Activity Types.
Edit activity types
To edit an existing activity type, click on the activity type, and the activity type form loads.
Make any desired changes to the activity type form. The form automatically saves, but it can be saved manually at any time by clicking the Save Manually option, represented by a (cloud upload) icon, located in the top-left corner of the page.
Create new activity types
To create a new activity type, click New from the Activity Types page, and a blank activity type form loads. Enter a Name for the activity type at the top of the form, then enter the following information on the form.
Activity Settings section
- Action: Using the drop-down menu, select an action associated with this new activity type. Some actions trigger specific behaviors after an activity is scheduled, such as:
- Upload Document: If selected, a link to upload a document is automatically added to the planned activity in the chatter.
- Call: If selected, call information is logged in the chatter and displayed on relevant records.
- Meeting: If selected, a meeting is created in the chatter and displayed on relevant records.
- Request Signature: If selected, a link to open a signature request pop-up window is automatically added to the planned activity in the chatter. This requires the WindoorERP Sign application to be installed.
Note
Available activity types vary based on the installed applications in the database.
- Folder: Select a specific folder to save a document to. This field only appears if Upload Document is selected for the Action.
- Default User: Select a user from the drop-down menu to automatically assign this activity to the selected user when this activity type is scheduled. If this field is left blank, the activity is assigned to the user who creates the activity.
- Default Summary: enter a note to include whenever this activity type is created.
Note
The information in the Default User and Default Summary fields are included when an activity is created. However, they can be altered before the activity is scheduled or saved.
- Keep Done: Tick this checkbox to keep activities that have been marked as
Donevisible in the activity view. - Default Note: enter any notes to appear with the activity.
Next Activity section
It is possible to have another activity either suggested or triggered. To do so, configure the Next Activity section.
- Chaining Type: select either Suggest Next Activity or Trigger Next Activity from the drop-down menu. Depending on the selected option, either the Suggest or Trigger field is displayed.
Note
The Chaining Type field does not appear if Upload Document is selected for the Action.
- Suggest/Trigger: depending on what is selected for the Chaining Type, this field either displays Suggest or Trigger. Using the drop-down menu, select the activity to recommend or schedule as a follow-up task to the activity type.
- Schedule: configure when the next activity is suggested or triggered. First, enter a numerical value indicating when the activity is suggested or triggered. Next to this field, a Days field is visible. Click Days, the default option, to reveal a drop-down menu. Select the desired time-frame option from the list. The options are Days, Weeks, or Months. Lastly, using the drop-down menu, select whether the activity is scheduled or triggered either after previous activity deadline or after completion date.
Where you can schedule one
Any screen that carries a chatter, and three of the standard views, can create an activity. Which one you use is a matter of where you happen to be, not of what the activity can do.
From the chatter
The route above: open the record, click Activity, fill in the form. Use it when you are already reading the record and the follow-up is about that one job.
From the kanban view
Click the (clock) icon at the bottom of a card, then + Schedule An Activity. Fastest way to work down a pipeline column assigning next steps.
From the list view
Use the clock in the Activities column. If that column is not shown, reveal it with the (adjust) icon at the far right of the header row, then click the clock on the row you want and choose + Schedule an activity.
From the activity view
Most applications offer an activity view behind the (clock) icon among the view switchers. It is a grid: every record is a row, every activity type a column. Hover a cell and click to schedule. This is the view for a supervisor asking "what is outstanding across the whole pipeline?" rather than "what is outstanding on this job?".
Note
Where a record already has an activity, the clock icon is replaced by the icon of that activity type. Click that icon to add a second one — the first is not overwritten.
Reading the icons and colours
The icon tells you what kind of follow-up is planned; the colour tells you whether it is late. Both are consistent everywhere in WindoorERP, whatever the app or the view.
| Icon | Meaning |
|---|---|
| Clock | The default — no activity type has claimed the record yet |
| Phone | A call is scheduled |
| Envelope | An email is scheduled |
| Check | A to-do is scheduled |
| Users | A meeting is scheduled |
| Upload | A document is expected |
| Signature | A signature has been requested |
Green is due in the future, orange is due today, red is overdue.
See everything you owe
The (clock) icon in the top bar is your whole workload, whichever app it came from. The red bubble is the count.
- Click the clock icon in the upper-right corner.
- Read the applications listed — each one groups the activities waiting in it.
- Within each, work the Late block before Today, and Today before Future.
- Click a line to open the records behind it.
Example
A site supervisor opens the clock menu and sees Installation with three late items and Sales with one due today. The three late ones are surveys booked for last week that nobody closed — the schedule has been wrong for a week, and nobody noticed until the list was read.
Configure activity types
Activity types are shared settings, not personal ones: they decide which follow-ups exist, who they land on by default, and what happens after one is completed.
Where activity types live
The database-wide list is under Settings › Discuss › Activity Types. Most applications also keep their own list under their Configuration menu — the types offered in CRM are not the types offered in Field Service.
Activity Settings
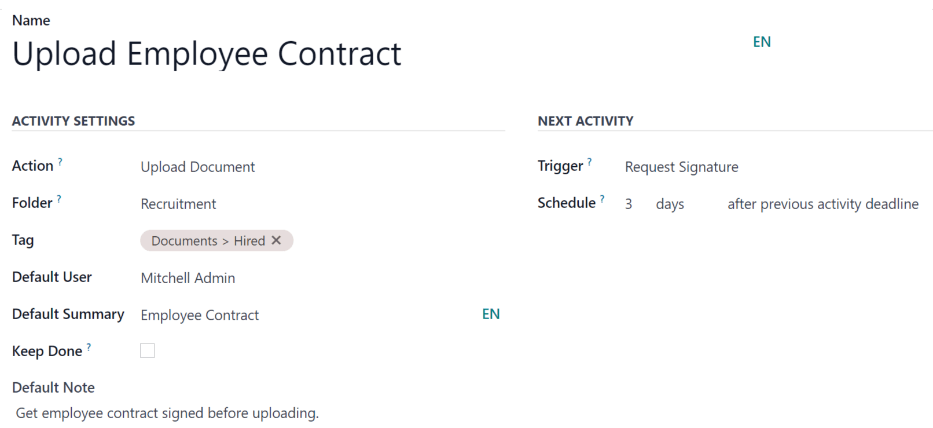
- Action — the behaviour attached to the type: Upload Document adds an upload link to the planned activity, Call and Meeting log the call or create the meeting, and Request Signature opens a signature request (this one needs the Sign application).
- Folder — where an uploaded document is filed. Only shown when the action is Upload Document.
- Default User — the person this type is always assigned to. Leave it empty and it goes to whoever schedules it.
- Default Summary — pre-filled title, editable before saving.
- Keep Done — keeps completed activities visible in the activity view instead of clearing them.
- Default Note — standing instructions that appear with every activity of this type: the checklist for a site survey, for instance.
Chaining the next activity
The Next Activity section is what turns single tasks into a process.
- Chaining Type — Suggest Next Activity offers the follow-up when this one is marked done; Trigger Next Activity creates it automatically. (The field is hidden when the action is Upload Document.)
- Suggest / Trigger — which activity type comes next.
- Schedule — how long after, in days, weeks or months, and whether the clock starts from the previous activity's deadline or its completion date.
Example
A Site survey type triggers Confirm measurements with customer two days after completion. The surveyor never has to remember the call, and a survey that was done last week without a confirmation call is visible as an overdue activity.
See also
Activities and stages answer different questions: a stage says where a job is, an activity says what happens next. Use both — see Move work through stages.
Common mistakes
- Logging a note instead of scheduling an activity. A note is a record of the past; only an activity comes back to find you.
- Pressing Mark Done at the moment of scheduling, which files the task as complete before anyone has done it.
- Assigning activities to yourself out of habit when the work belongs to a colleague — the workload then looks balanced when it is not.
- Vague summaries. "Follow up" in a list of forty activities tells the owner nothing.
- Letting the red count grow. Overdue activities are the earliest visible symptom of a job going wrong.
Was this article helpful?
Thanks — your feedback helps.
Running a window or door factory?
Ask for a demo