
Add and manage users
Grant portal access to a customer
What this does
Turns a contact into a portal user, so they can sign in and follow their own orders and invoices. It all happens from the Contacts app.
Steps
The window shows three fields: Contact, filled in automatically; Email, the login address; and Latest Authentication, the last time they used the portal — blank if they never have.
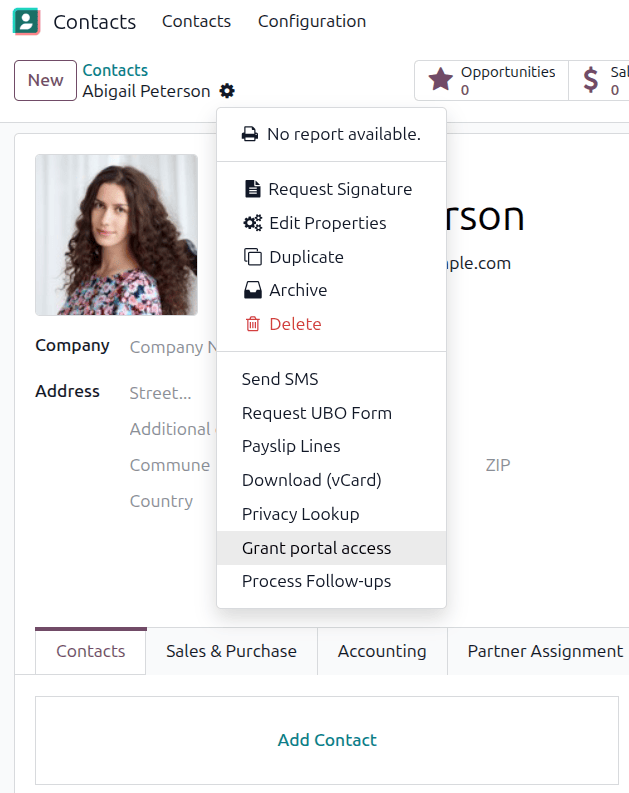
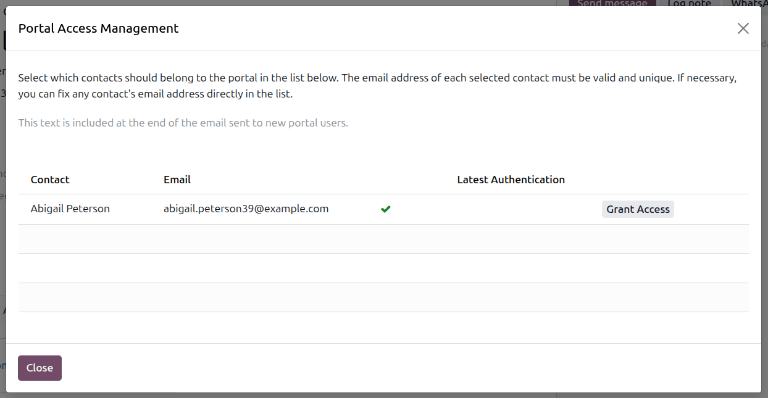
For the customers and vendors of a business to begin using a user portal, they must first be granted access by the business. The process to do this begins in the Contacts application.
-
01
Open the Contacts app and select the contact. If they are not in the database yet, click New and enter their details first.
-
02
Click the (Actions) menu and choose Grant portal access.
-
03
In the Portal Access Management window, check the Email — this is the address they will sign in with.
-
04
Click Grant Access. An invitation goes out to that address.
Adding portal access to a contact
From the main WindoorERP dashboard, open the Contacts application. If the contact to be granted access is not yet in the database, create an entry for them by clicking the New button and entering their details. Otherwise, choose an existing contact, then click on the (Actions) drop-down menu and select Grant portal access.
This brings up the Portal Access Management window, which has three fields:
- Contact: This field is automatically populated with the name on the contact.
- Email: This field shows the contact's email address used to log into the portal.
- Latest Authentication: The last time the user accessed the portal appears on this line. If the user has never accessed the portal, it is blank.
To grant portal access, first enter the email address the contact will use to log into the portal. This may have been automatically entered by the system if an existing contact is being granted access. Then click the Grant Access button to finish.
Note
When portal access is granted to a Company, all contacts affiliated with that company are granted portal access. Individual contacts can be removed as needed.
Granting access to multiple users at once
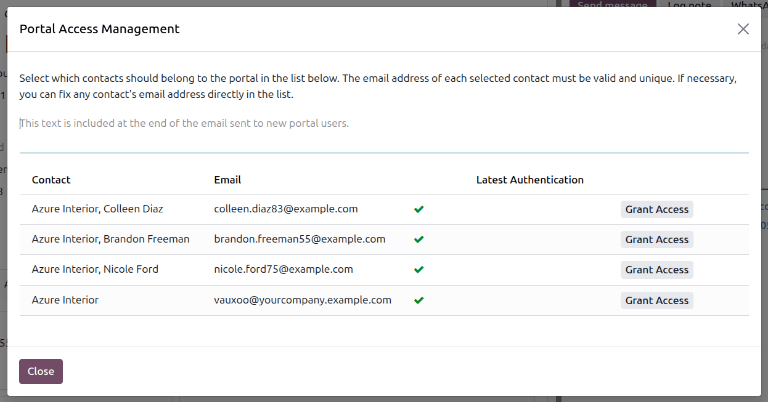
To grant portal access to multiple users from a single company at once, navigate to the contact listing for that company, then click Action › Grant portal access to view a list of the company's related contacts. Click Grant Access for each contact that needs portal access. An email is sent to the specified email address, indicating that the contact is now a portal user for that WindoorERP database.
Revoking portal access
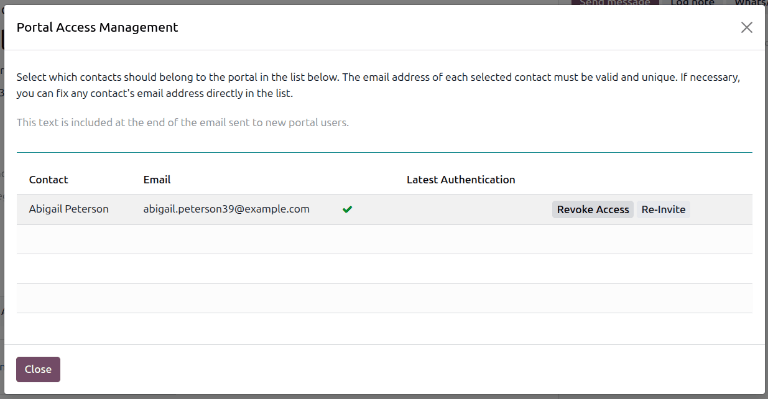
Some situations may require revoking an individual's portal access, such as when they retire or leave a company. Portal access can be revoked from a contact at any time by navigating to a contact, clicking Action › Grant portal access, and then clicking Revoke Access.
Several people at one company
Open the company contact, then Actions › Grant portal access: every related contact is listed. Click Grant Access next to each person who needs it, and each gets their own invitation.
Take access away
When somebody leaves the customer's company, open their contact, choose Actions › Grant portal access and click Revoke Access.
Common mistakes
- Granting access at company level without meaning to — every contact attached to that company gets in. Remove the ones who should not be there afterwards.
- Leaving access with a person who has left the customer: revoke it the day you hear about it.
- Using a shared mailbox as the login. One portal login per person, or you cannot tell who did what.
Was this article helpful?
Thanks — your feedback helps.
Running a window or door factory?
Ask for a demo