
Getting Started
Export records to a file
What this does
Takes any set of records out of WindoorERP as a spreadsheet — for an analysis the built-in reports do not cover, for an auditor, or as the first half of a bulk update.
Steps
In WindoorERP, it is sometimes necessary to export or import data for running reports, or for data modification. This document covers the export and import of data into and out of WindoorERP.
Important
Sometimes, users run into a 'time out' error, or a record does not process, due to its size. This can occur with large exports, or in cases where the import file is too large. To circumvent this limitation surrounding the size of the records, process exports or imports in smaller batches.
-
01
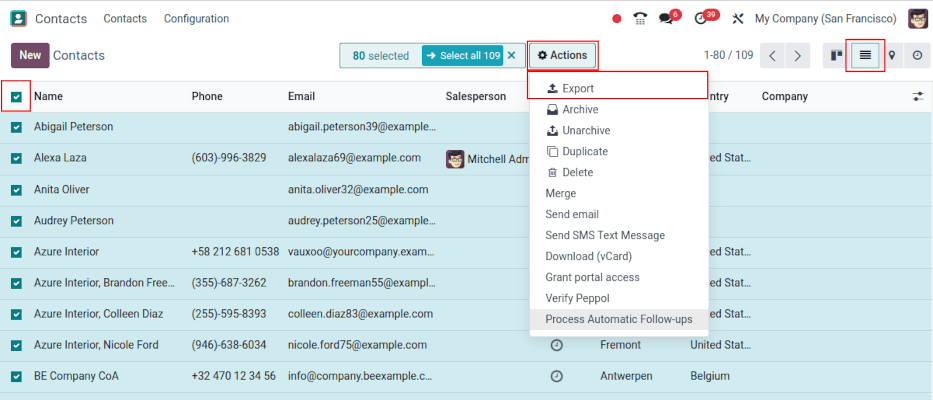
Open the screen holding the records and switch to the (list) view.
-
02
Tick the records to export — or the header checkbox for everything the current filter shows.
-
03
Click (Actions) and choose Export.
-
04
Pick the format: .csv for plain data, .xlsx for a real spreadsheet.
-
05
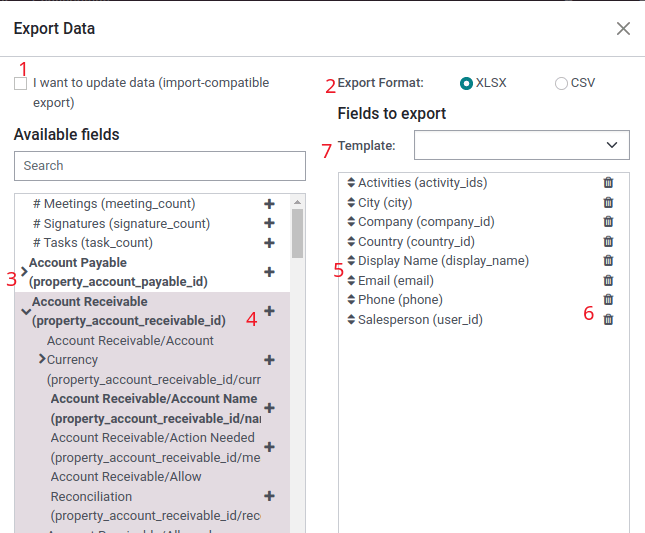
Add the fields you need to Fields to export, drag them into the order you want, and remove any you added by mistake.
-
06
Click Export.
Export data from WindoorERP
When working with a database, it is sometimes necessary to export data in a distinct file. Doing so can aid in reporting on activities, although, WindoorERP provides a precise reporting tool with each available application.
With WindoorERP, the values can be exported from any field in any record. To do so, activate the list view (List) icon, on the items that need to be exported, and then select the records that should be exported. To select a record, tick the checkbox next to the corresponding record. Finally, click the Action button, and select Export.
When clicking on Export, a Export Data pop-over window appears, with several options for the data to export:
- With the I want to update data (import-compatable export) option ticked, the system only shows the fields that can be imported. This is helpful in the case where the existing records need to be updated. This works like a filter. Leaving the box unticked, gives many more field options because it shows all the fields, not only the ones that can be imported.
- When exporting, there is the option to export in two formats:
.csvand.xls. With.csv, items are separated by a comma, while.xlsholds information about all the worksheets in a file, including both content and formatting. - These are the items that can be exported. Use the (Show sub-fields) icon to display more sub-field options. Use the Search bar to find specific fields. To use the Search option more efficiently, click on all the (Show sub-fields) icon to display all fields.
- The (Select field) icon button is present to add fields to the Fields to export list.
- The (Sort) icon to the left of the selected fields can be used to move the fields up and down, to change the order in which they are displayed in the exported file. Drag-and-drop using the (Sort) icon.
- The (Remove field) icon is used to remove fields. Click the (Remove field) icon to remove the field.
- For recurring reports, it is helpful to save export presets. Select all the needed fields, and click on the template drop-down menu. Once there, click on New template, and give a unique name to the export template. Click the (floppy drive) icon to save the configuration. The next time the same list needs to be exported, select the related template that was previously saved from the drop-down menu.
Tip
It is helpful to know the field's external identifier. For example, Related Company in the export user interface is equal to parent_id (external identifier). This is helpful because then, the only data exported is what should be modified and re-imported.
Exporting in order to re-import
Tick I want to update data (import-compatible export) and the field list narrows to what can be imported again, and the External ID of every record travels with the file. That ID is what turns a second import into an update instead of a pile of duplicates.
Save the field selection
For a report you produce every month, open the template dropdown, click New template, name it, and save with the (save) icon. Next time, pick the template and the whole field list comes back.
Common mistakes
- Exporting tens of thousands of rows in one go and hitting a timeout. Filter into smaller batches.
- Exporting without import-compatible ticked, then trying to import the file back — half the columns will not map.
- Sending a raw export outside the company without checking what is in the columns. Cost prices travel very easily.
Was this article helpful?
Thanks — your feedback helps.
Running a window or door factory?
Ask for a demo